

How to build a basic DIY welding bench for under £150.00
10 Step Guide to Building a basic Welding Table
Creating a basic welding table is an excellent DIY project for anyone interested in developing there welding skills. It will give you a surface to work from for future projects but it also allows you to customise your workspace to suit your needs.
In this blog post, the weld space will guide you through the steps to make a basic welding table for under £150.00 which requires minimum number of tools, machinery and knowledge. This step by step guide will explain how to build a welding table from scratch. We have even provided you with a cut list, dimensions and where to buy the material from.
Discover more welding knowledge and skills via The Weld Space Academy
Why build a welding bench?
When learning to weld having a proper bench to work from is helpful. Not only does it save you working on the floor but it offers several advantages and safety considerations that make it important for welding.
Grounding: A welding bench helps provide good electrical grounding to your work piece. Without the need to attach large earth clamps onto what you are welding. Grounding is crucial in welding as it helps complete the electrical circuit during the process. Metal benches offers you an obvious place to attach our earth clamp and ground your machine.
Stability and Support: A metal bench provides a stable and sturdy surface to work from. It helps ensure that your workpiece flat.
Workpiece Positioning: Welding often requires precise positioning of the workpiece, especially when welding complex objects. A basic metal work bench can allows you to attach clamps, vices, or fixtures to it. Due to there robust nature, a metal work bench allows you to hammer and manipulate metalwork to a desired shape when required. Making it easier to hold the workpiece in the desired position for accurate welding.
Versatility and Cost Effectiveness: Metal benches are suitable for a wide range of welding processes, including MIG, TIG and Arc welding. Why spend the money buying something that you can make from a raw material. This will save you money in the long run and help make you a more resourceful welder.
Materials and Tools needed:
If you choose to build your welding bench with us through out Book a Bench Scheme at The Weld Space. We have all the tool and machinery required to get you going. We can also provide some 1-2-1 tuition if you want it. With the right planning we would recommend for a beginner to plan to use hire for 2 full days.
As this is a DIY project we’ve have provided a list of basic welding and metalworking tools that will help you create this basic welding bench. .
MIG or ARC Welder
Tape Measure
Metal Scribe
A Metal Square
Angle Grinder
Grinding Discs
Flap Wheel (80 Grit)
Preparation Wheel (Available from Screwfix)
Degreaser
A long sash clamp
G-clamps x2
Your only 10 Steps away from building your own basic welding table:
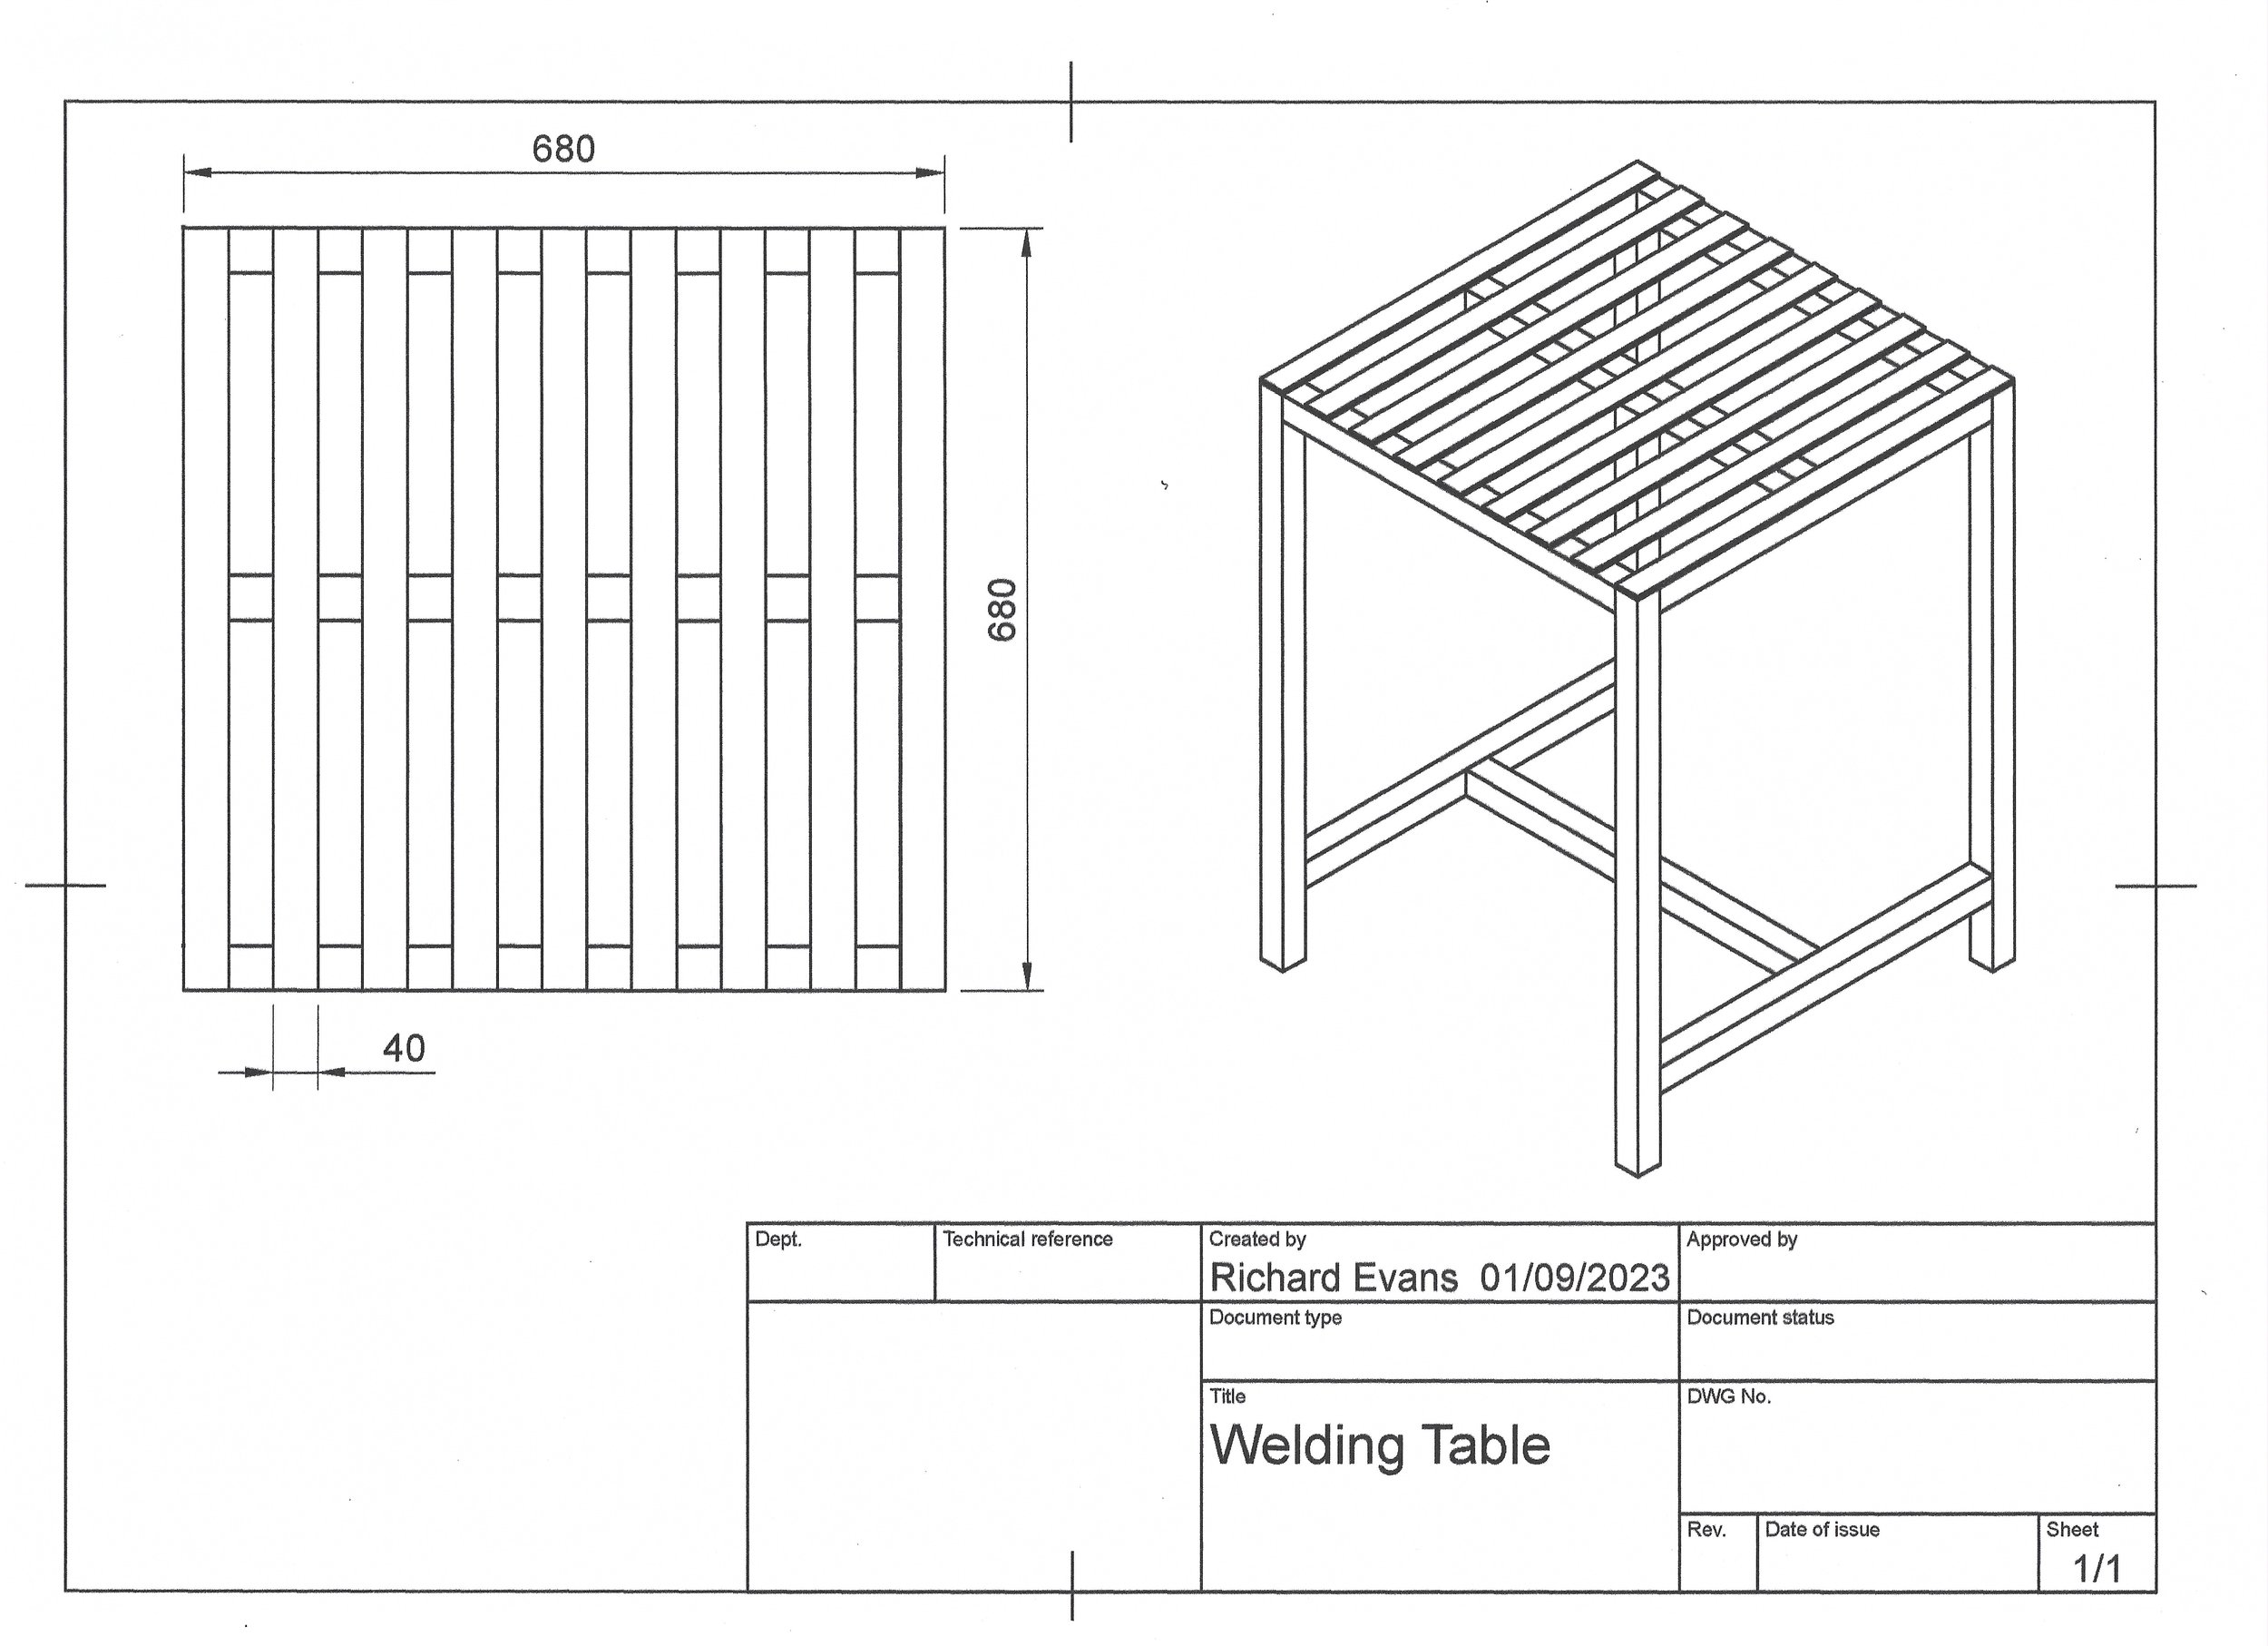
Step 1: Design Your Table
You can design your own table for sure, but we have done the hard-work for you by creating a small basic welding table design for under £150.00.. We feel this design is suitable for a lot of DIY enthusiast and the space people might have available. Size of projects and also the cost of materials needed.
(For information the most of your time making this bench should be spent preparing the material, assembling and spot welding it together. If properly prepared the welding should take very little time. Think about it like this; Cutting and Preparing metal 30% of your time, Assembly and Spot Welding 40%, Welding joinery 10%, Grinding 20%).
Step 2: Order Materials:
Being based in Plymouth, Devon we have a number of local suppliers to use. We regularly order our steel from Austen Knapman who also offer a cutting service if you do not own a saw. Metal normally comes in 7m lengths. If you are collecting we would advise you ask them to half the lengths. This will make it easier to manage.
If ordering online you can get the material cut to size for you saving you time.
Metals 4 U is also a useful online metal supplier.
If you are unsure about what you are ordering you can learn more about different types of mild steel here
Material to Order:
Mild Steel Box Section 40 x 40 x 3mm | TOTAL TO ORDER = 9000 mm (9 meters)
Mild Steel Flat Bar 40 x 5 mm | TOTAL TO ORDER = 7000 mm (7 metres)
Step 3: Cutting your metal to size!
From the techical drawings you can create your own cutting list. Which you will then use to cut the material to length. We would highly recommend using a chop saw or cut off saw. Using an angle grinder is possible, but bare in mind the cuts won’t be completely straight. This might cause issues when spot welding the table together.
Cutting List:

Step 4: Prepare your metal for welding
Once you have cut all your material to length. You will need to remove the mill scale to help with the welding process. Welding on top of mill scale doesn’t create proper fusion and will make your welds weaker. You can learn about the best grinding discs to remove mill scale here.
When the joinery sections of the metal are free of Mill Scale. it’s always best to degrease your steel to make sure no contamination creeps into the welding process. Using any degreasing liquid is ok. We have used White Spirt in the past, Jizer or even methylated spirts. All these degreasers are available from your local hardware store.
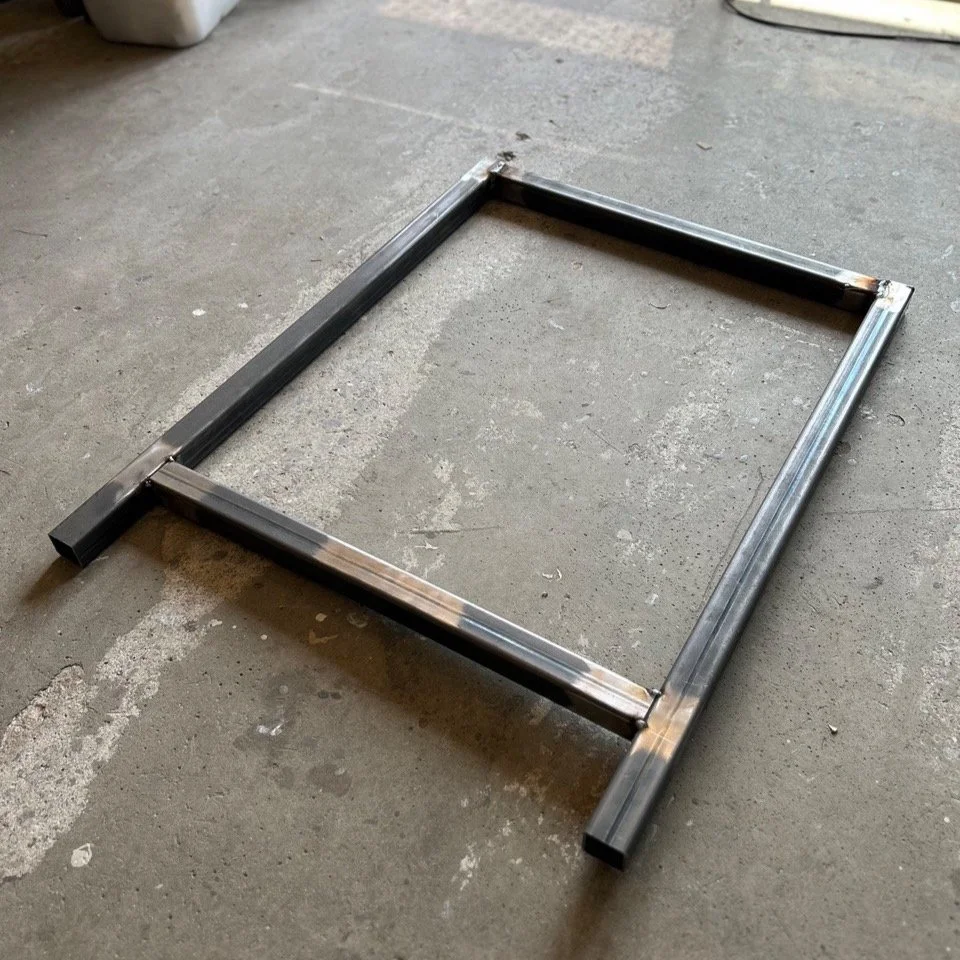
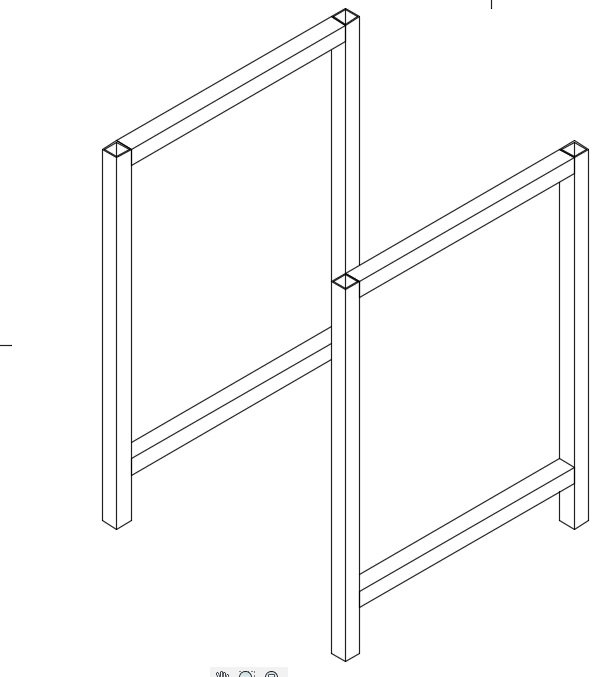
Step 5: Create your side faces.
Select the pieces require to build the side face of the welding bench. The techical drawings will help guide you here. Offer the pieces up so that it makes the shape of the bench. Make sure the fit is as tight as possible. Once you are happy with the fit, begin to spot weld the pieces together. Using your steel square here will help keep the piece square.
Repeat this process for the other side. If you are happy with your first piece. You can lay your next piece over the top of it and copy it’s shape.
Make sure the frame is square and true. How do you know the frame is square? You measure the diagonals (corner to corner) the distance should be equal. If they are not equal. You find the mean average of the distance and bring in the longer dimension. This can be done through using Sash Clamp. Once you are happy the frame is square finish spot welding it. Some welding might be required to hold the frame in it’s shape.


Step 5: One side of the bench design is made. Note: All corners where welding will happen are free of mill scale.
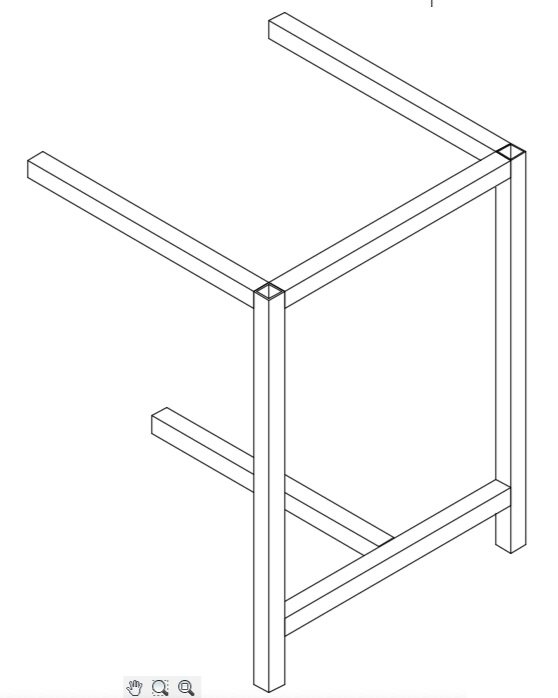
Step 6 & 7: Creating the bench in a 3D shape. Note: The Use of sash clamps for keeping the shape square. We apply the sash clamp and clamping pressure to the diagonals. You know it’s square when the diagonal dimensions are equal.
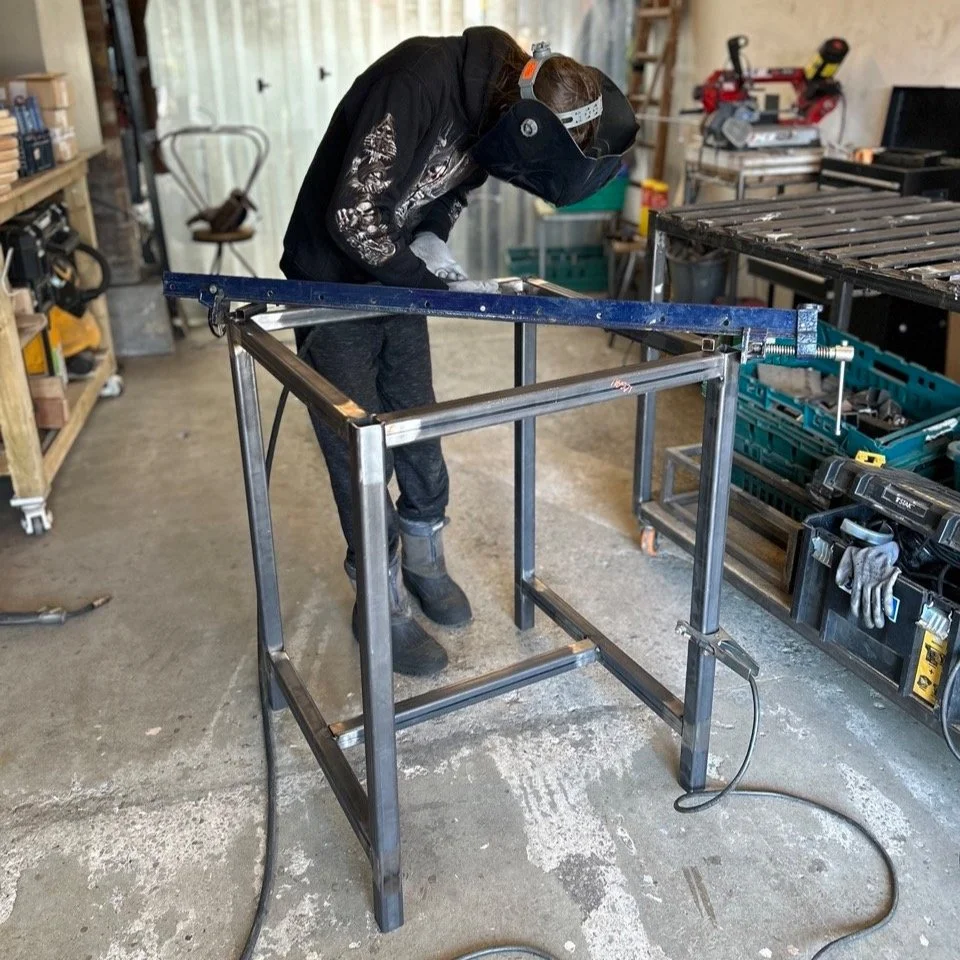
Step 6: : Add the horizontal:
Lay the one of the frames down on the floor and select the horizontal supports there should be 3. Use your square and spot weld these in place robustly. Unsure what a spot weld is? Well a spot weld is a small weld which holds a steel section in place. A good guide for a spot weld is that it should normally take 2-3 seconds to form. They are a precursor to running a good weld bead.
Step 7: : Add the remaining side.
Repeat the process with the remaining side and spot weld the whole frame together. It should now start to form a 3D structure and look like a welding bench. It will require some some to assembly the frame.
Once your welding bench has started to look more 3D. You want to check the squareness of the structure. To do this you measure the diagonals of the top. Again, these distances should be equal distance. If not use a sash clamp to bring in the longer diagonal dimension. If you don’t have a sash clamp you can weld the fillet to close the angle.
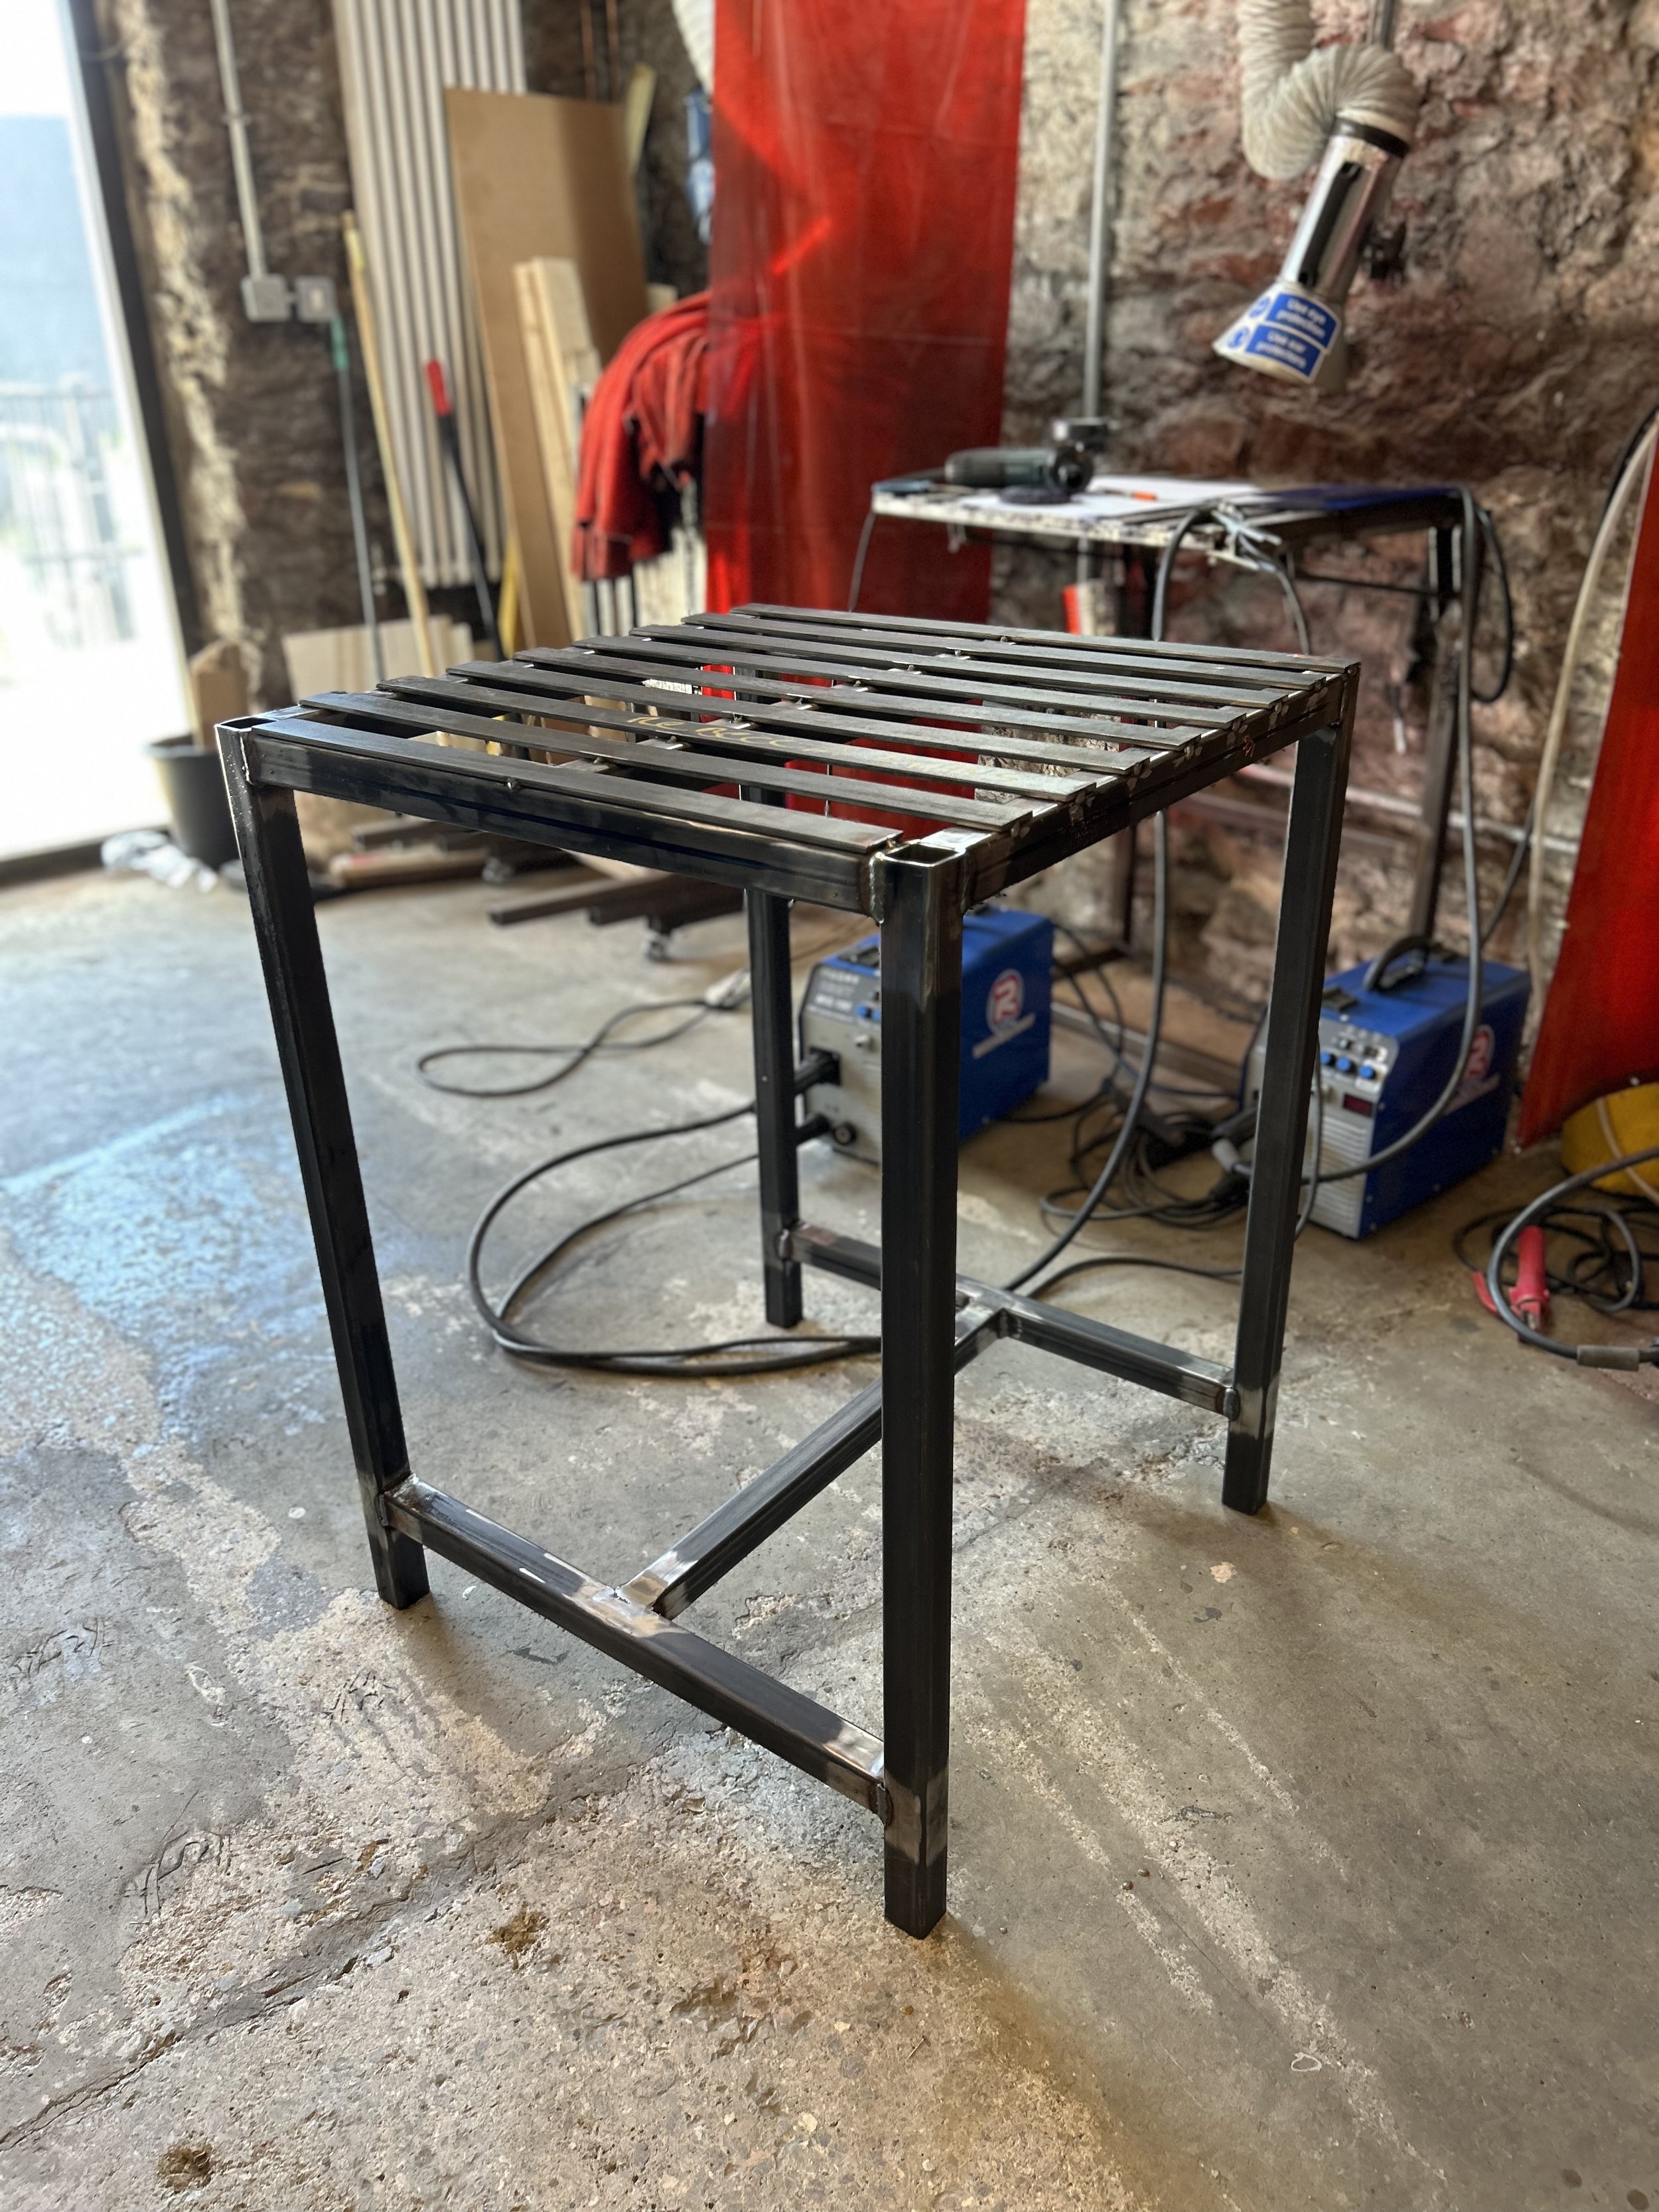
Step 8: : Adding the metal slats.
We’ve decide to use metal slats to make the table. For two reasons mainly, reason one is to do with cost buying 40x5mm flat bar and cutting the slats to length is cheaper than buying a large metal plate. Secondly; it allows you to attach G-clamps into the middle of the bench helping you with clamping and positioning work.
The benefit of using slats instead of a metal plate is that it’s a lot cheaper, however, If you wanted to make your table more heavy duty we would recommend using 40x10mm Flat Bar. Although this would exceed the £150 budget.
The metal slats need to be spot welded at the end and middle. You could have a 4th horizontal to insert at the top of the frame. This will support the welding tables top. Repeat this process until the table is covered with slats. They should be equally spaced 40mm apart from one and other.


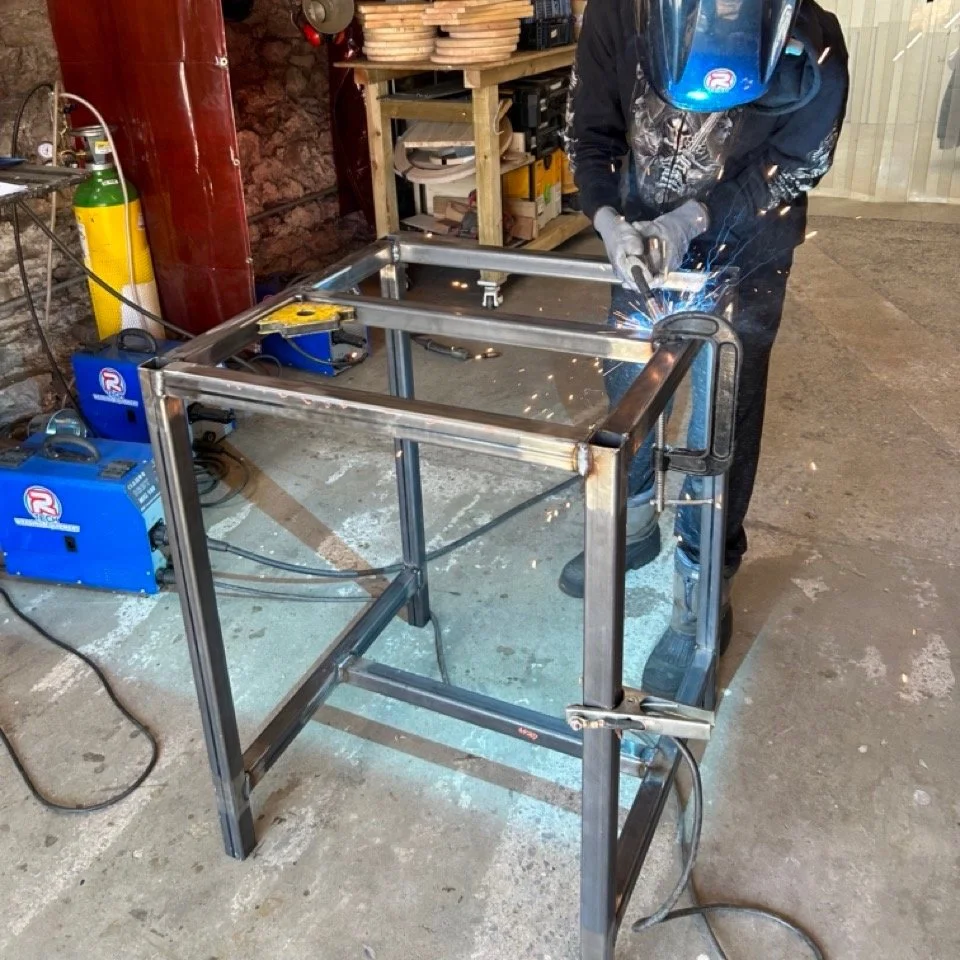
Step 8 & 9: Adding the final slat for support and welding up all the joints. Note that the earth is attached to the frame for grounding.
Step 10: Welding all the joint up and adding the slats. If your table is square the slats should sit on without any overhangs. To ensure equal spacing use a metal slat.
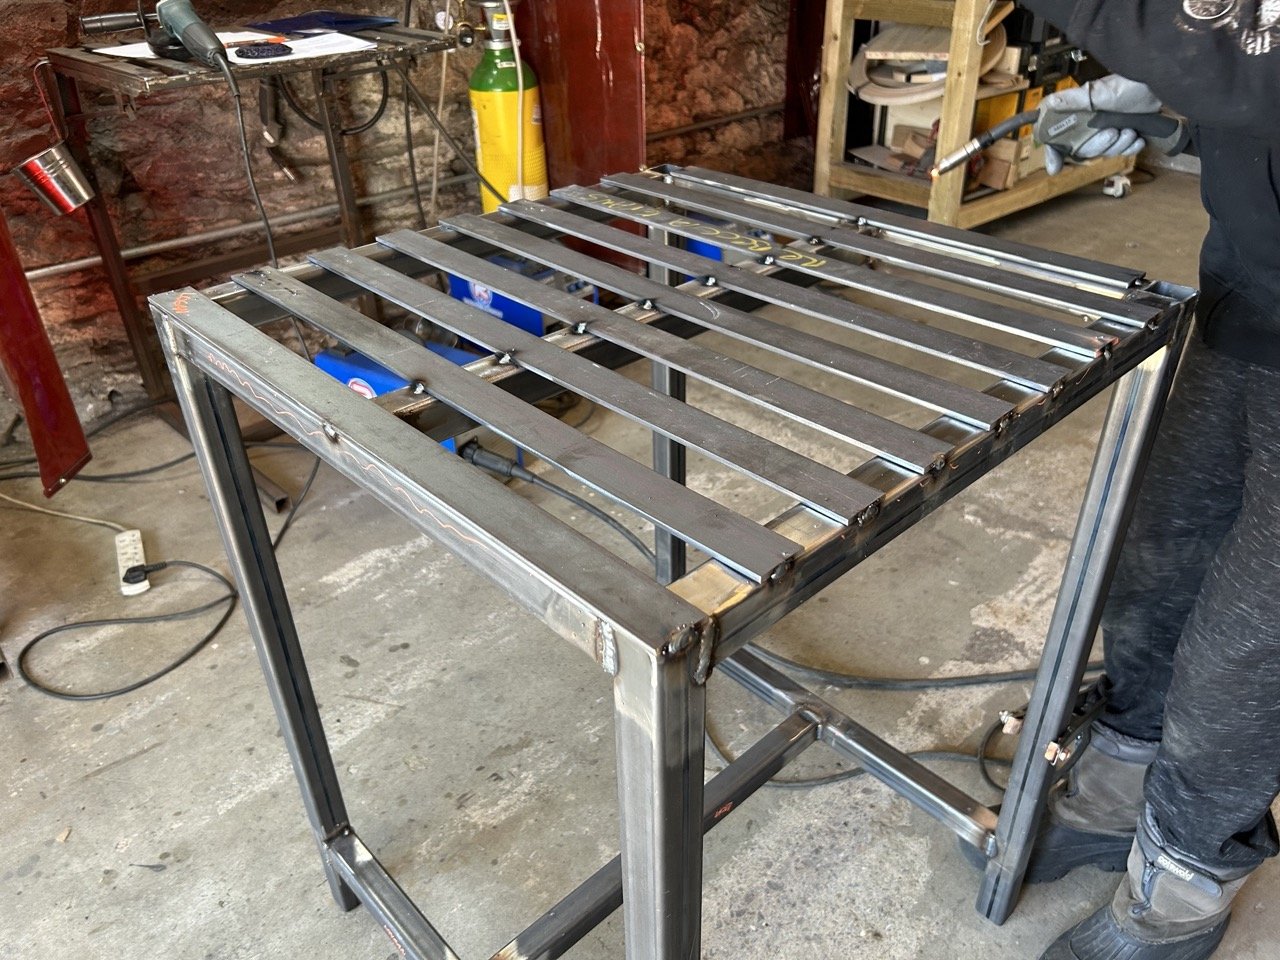
Step 9. Weld the Table up:
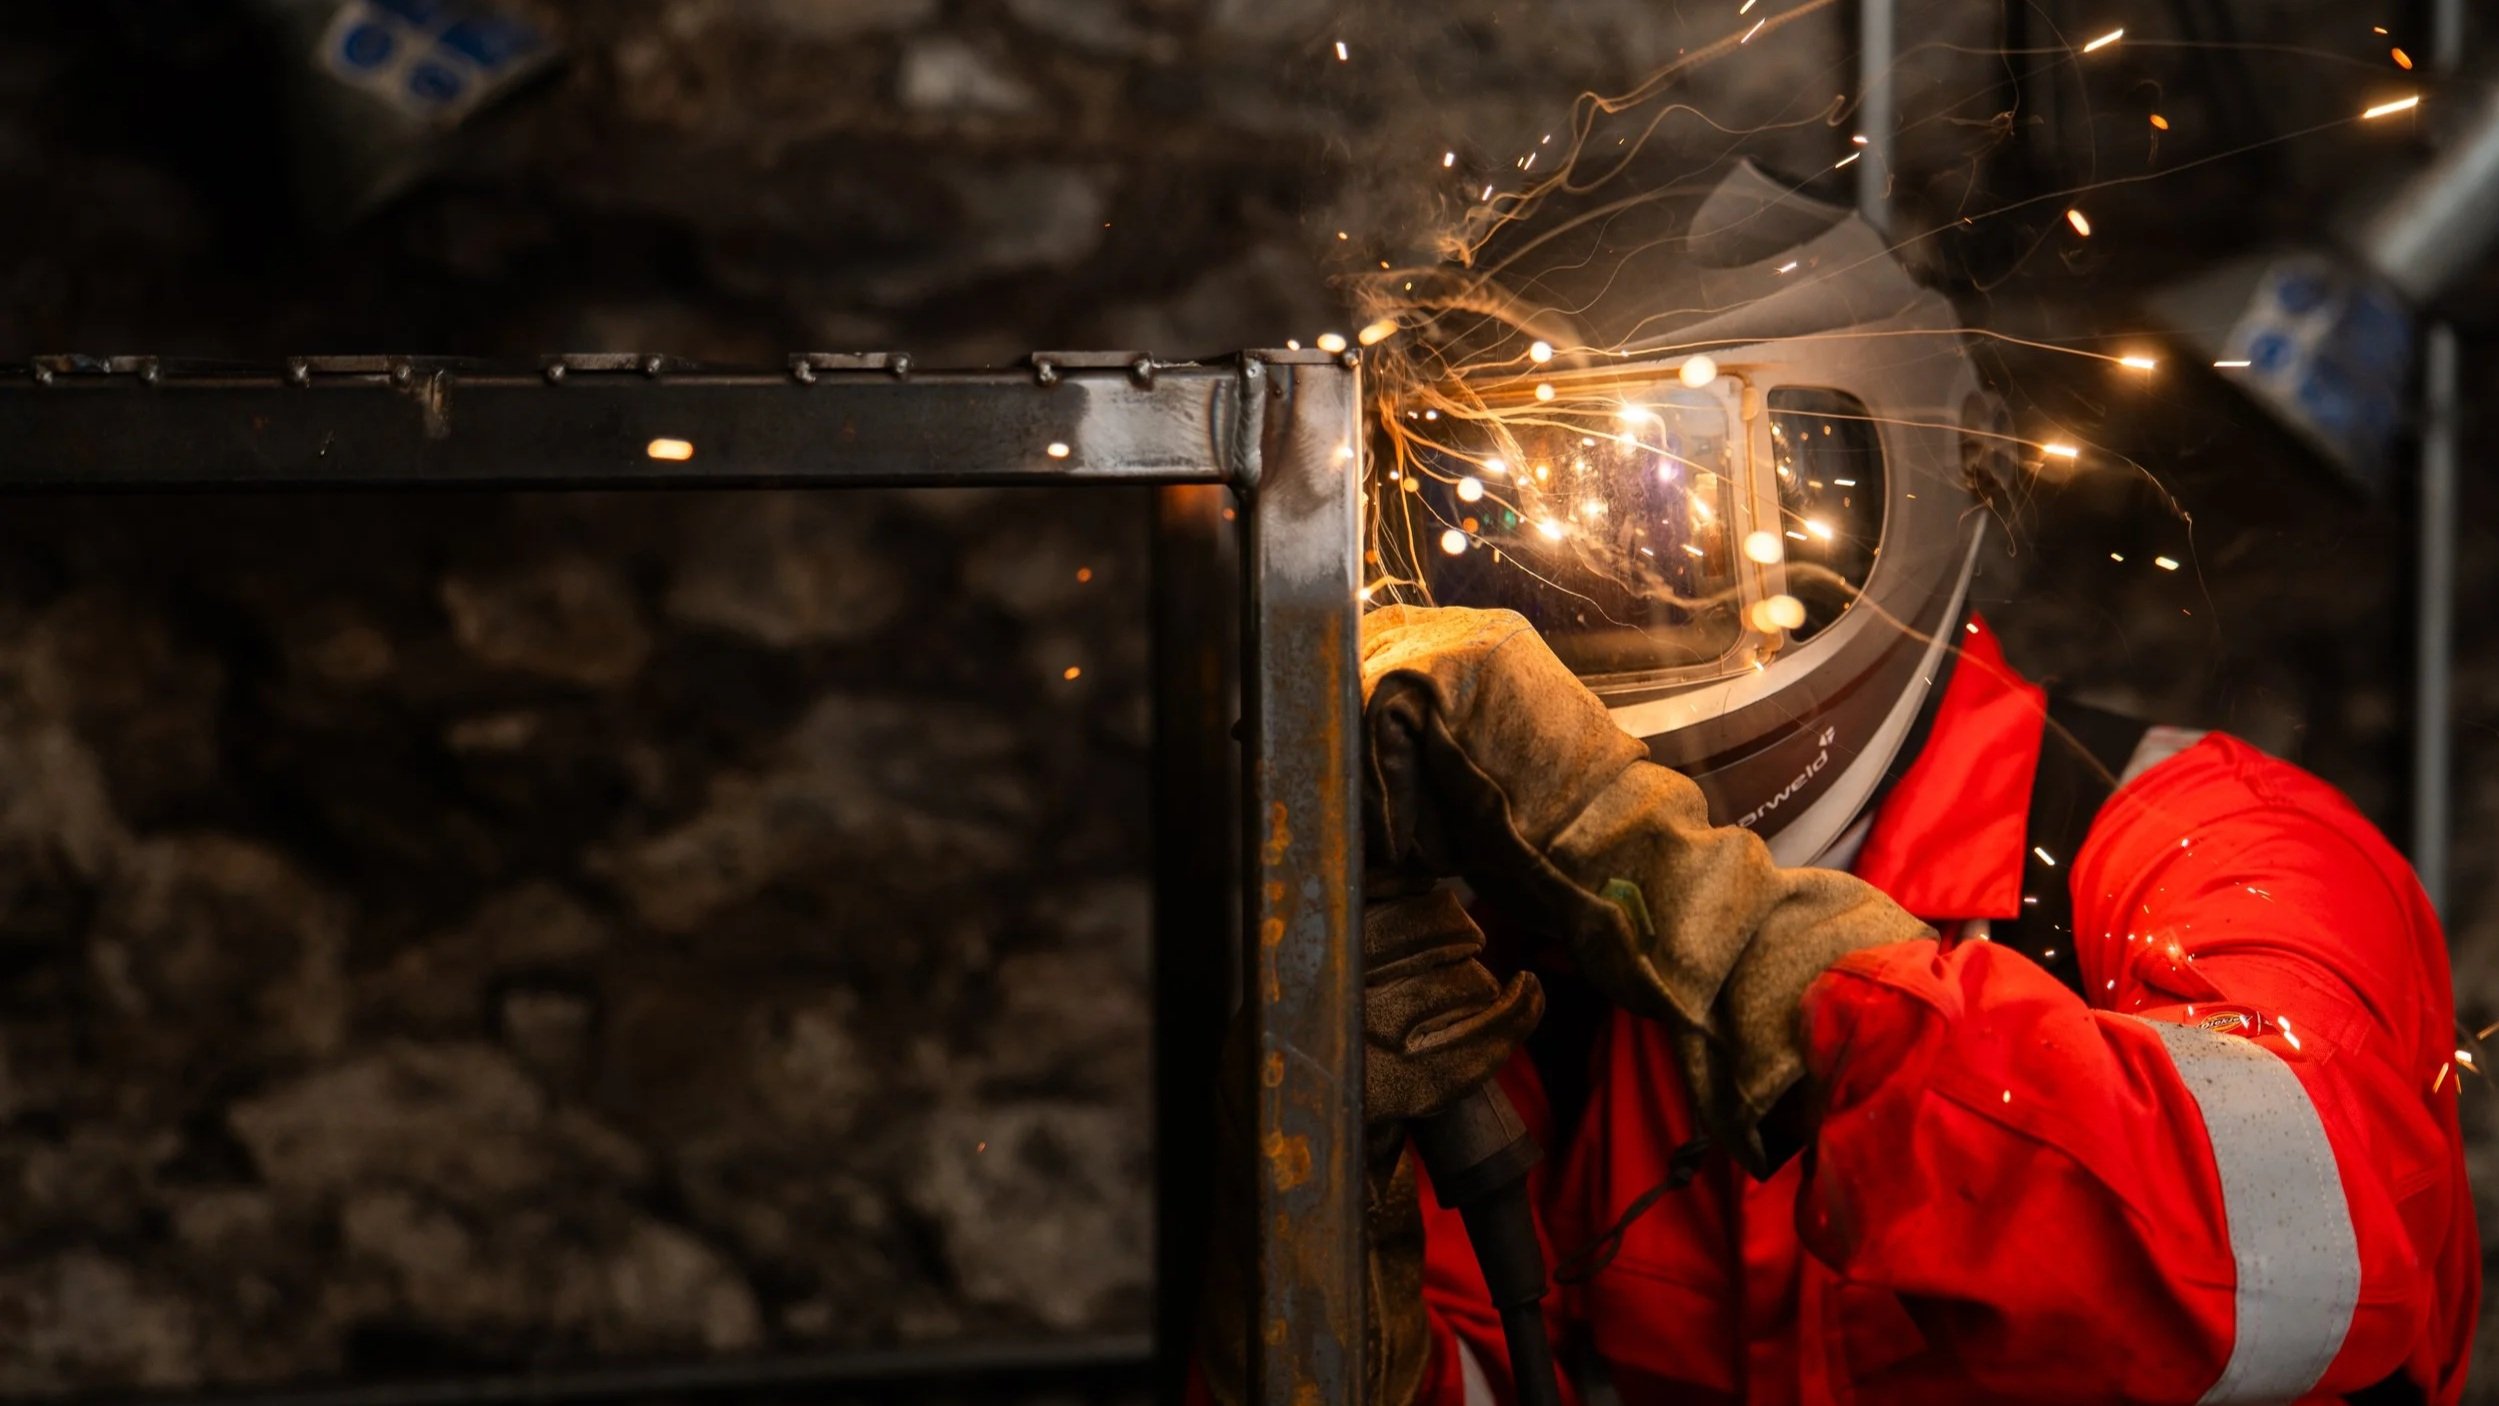
Now your basic welding table is assembled you will need to use your MIG or Arc Welder to weld up all the joinery. At this stage in the build your table is might be fragile still so be careful when doing this. If in doubt about the robustness, add more spot welds to the joinery. This has the benefit of stopping any movement during welding.
We recommend welding up a little section of the joinery at a time, and not focusing entirely on one area. It’s ok to weld a small section of a join, then move onto the next section then return to the original join later. Doing this will reduce the amount of heat going into the metal and stop it from moving around.
Step 10: Grinding and cleaning up your table:
Once you have completed welding the joinery. You can tidy up any welds using an angle grinder. We would recommend using all the nesscessary PPE equipment to do this. Unsure which angle grinding discs to use. Ready our blog here

Optional extras:
You can enhance a basic welding tables functionality and versatility with the inclusion of heavy duty casters. Castors, whether swivel or locking will allow you to move the table easily within your workshop. Make sure the castors have a brake.
Found the. plans helpful?
BUY US A COFFEE
Step 10: Finished table design. All welds are ground flush and no sharp corners